How to Build a Sun Compass
The layout of the hour lines
The angle at which your hour-lines should be laid out varies with the latitude for which the sun compass has been designed.
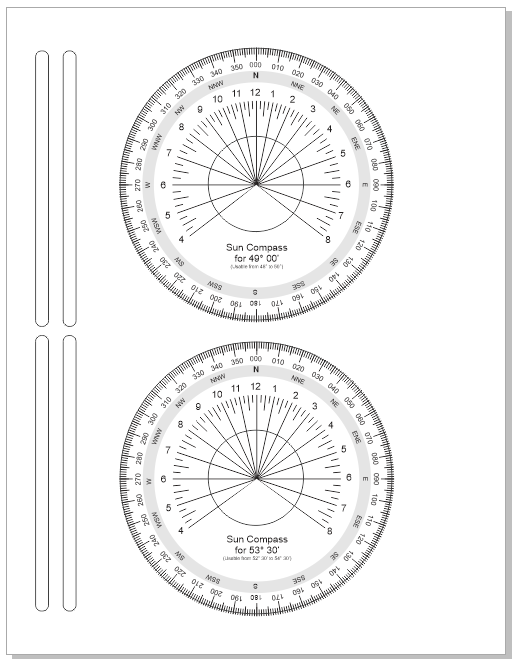
If you are interested in playing around with a sun compass in Edmonton - or on Lake Wabamun - or in the Gulf Islands of BC,
click here
to download a PDF file that will print
directly onto an Avery #7692 CD label sheet. If you have a vector drawing app like CorelDraw or Adobe Illustrator, or even the freeware Inkscape, and would like to build your
own templates from scratch, click here.
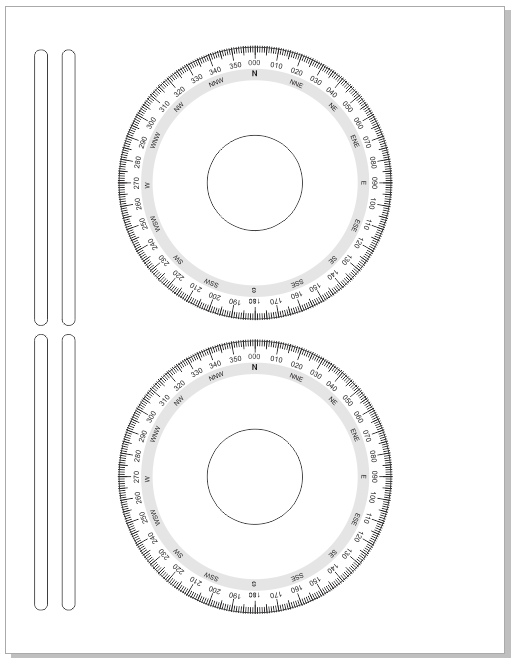
If you want to make a sun compass for some other latitude, then click here
to download an Avery #7692 template for generic sun compass faces.
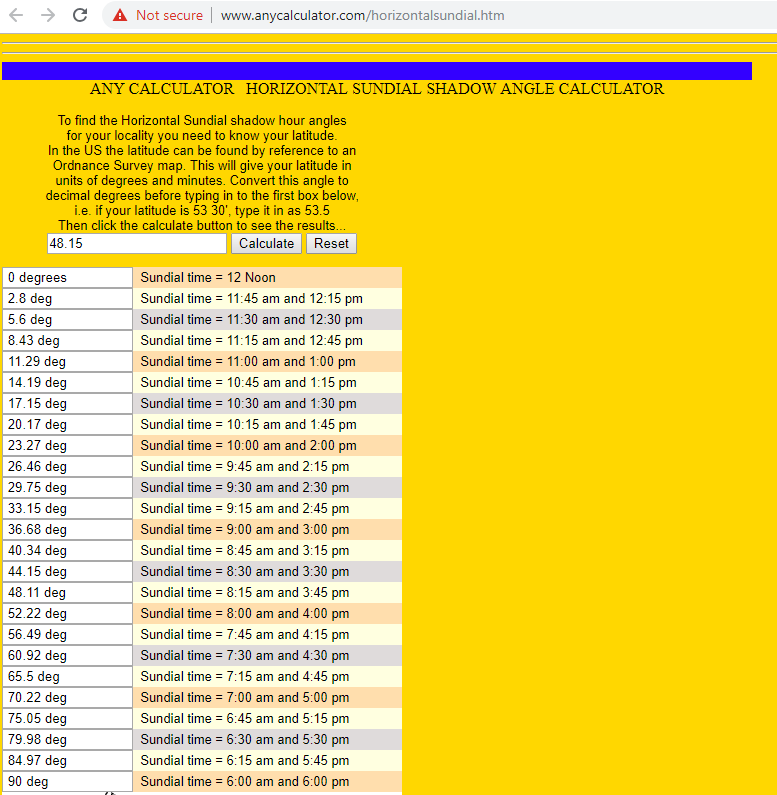
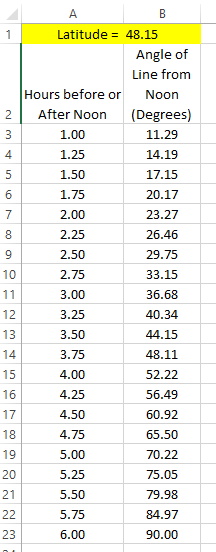
This web page will let you calculate the hour lines for any given latitude. For instance, if you want
to create a sundial for the Baie de Douarnenez near Brest, France, you would enter 48.15 as the latitude, and get this:
Since the generic sundial PDF file already has a scale of 360° around the outside edge, you can lay out hour lines to the specified angles using a straightedge.
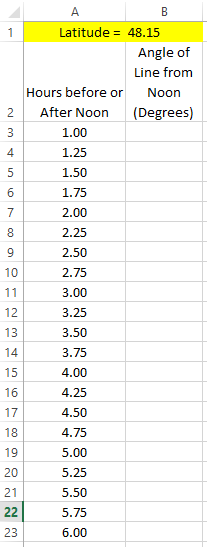
If the www.anycalculator.com web page becomes unavailable, you can do your own calculations in Excel. Lay out your spreadsheet like this:
In cell B3, enter this equation: =DEGREES(ATAN(SIN(RADIANS($B$1))*TAN(RADIANS(15)*A3)))
...and copy the same equation into cells B4 to B23.
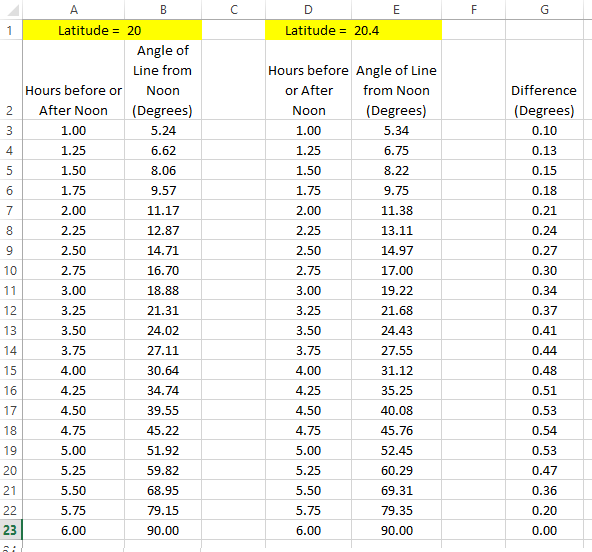
If you want to play around with accuracy, you can tweak your spreadsheet so it looks like this, with a second latitude.
In cell G3 I have the equation =ABS(B3-E3) Copy it to cells G4 to G23.
This makes it easy to confirm that if you have a sundial that is constructed for latitude 20°, if you try to use it as far north as just 20.4°, you will have an error of
½°+ by 4:30 in the afternoon. As indicated here, this type of sundial is simply of not much use in the tropics.
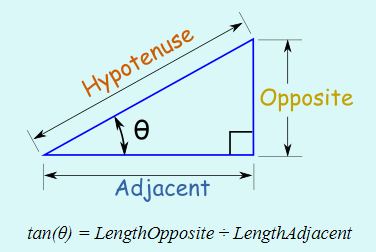
The angle of the gnomon
The gnomon (i.e. the slanted string that casts the shadow) must be at an angle equal to the latitude of the location for which your sundial is optimized.
That is, if you are building a sun compass for 48.15°, you can calculate where to drill your holes to get you this angle
by keeping this relationship in mind:
So if you have affixed your Avery label to a piece of wood, and have measured from the center of the diagram to the back edge of the wood and have determined that the distance
is 2.88 inches, then you will flip this equation around and get:
LengthOpposite = tan(48.15°) * LengthAdjacent
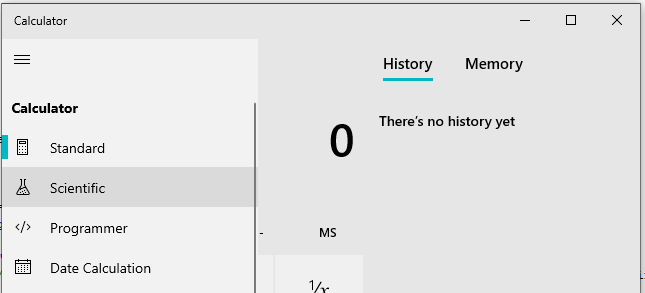
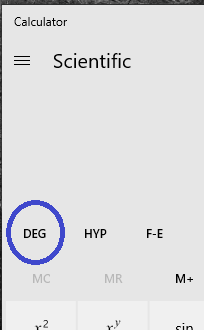
To calculate this with the Windows 10 calculator applet, click on the configuration menu to change from the standard calculator to the scientific calculator.
This will make the buttons for sine, cosine, and tangent appear.
Ensure that the applet is set up to take angles in degrees.
If it says "Rad" or Grad", click on that label until it says "Deg".
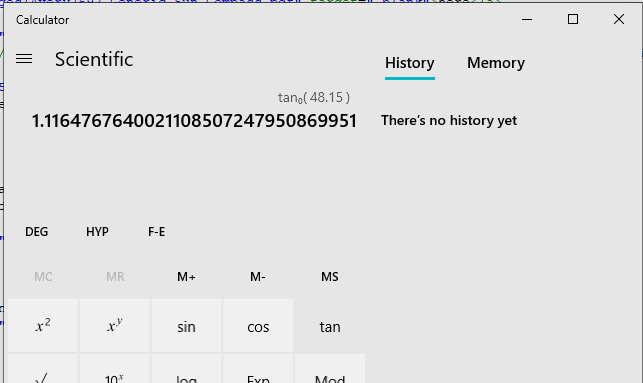
Now type [48.15] and then hit [tan]. You will see this:
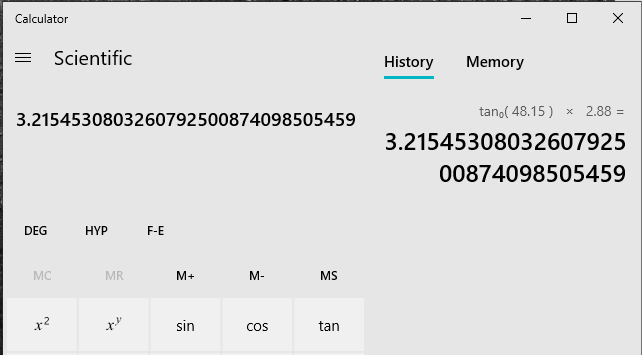
Then type [*] [2.88] and hit [=].
You will see this:
Ensure that you already have your vertical piece attached to the horizontal piece by hinges, then measure up from the face 3.21 inches. Use a drafting triangle to ensure
that the vertical piece actually is "vertical". Make a mark and you are ready to drill your hole.
If you choose to make your sun compass from a CD and plastic CD case, then the whole process can be finished in 30 minutes. However, when you go to drill your hole, if you have the
drill spinning in the normal direction, it will shatter the plastic - which is quite brittle. The better strategy would be to reverse the direction of the drill and
use the friction between the bit and the plastic to melt your way through the plastic.
For my next sun compass, I plan to use old shirt buttons as a way to tie off the string. In my wooden sun compass, I affixed the string to short screws. But when I turned the screw,
it wanted to wind the string up a bit...thereby changing the length of the string.
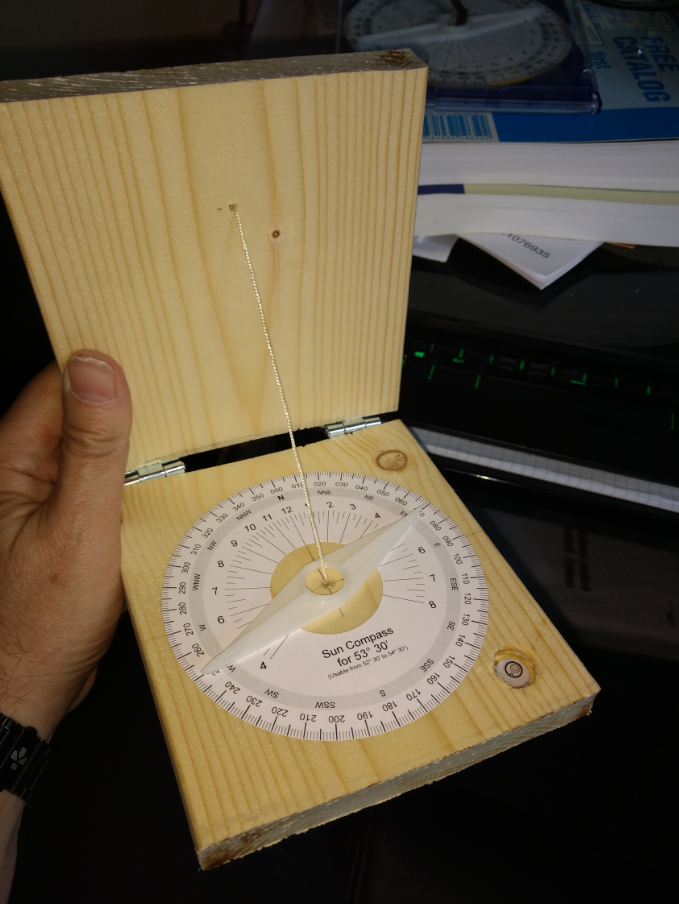
Frankly, building a sun compass is a bit of a trial-and-error craft project. Here was my first effort, done with a CD.
What I noticed from this was 1) I needed a skinnier gnomon, and 2) I could certainly get bearings from this compass, but it would be easier if I had a pointer that I could spin around
the center of the compass. So here was my second effort, in wood.
The pointer
I got a friend who has a 3D printer to create the pointer for me. Click here to download the design-definition file that he created to feed to his printer.
You can take this
file to any branch of the Edmonton Public Library that has a 3D printer on site and have them print this for you. You can also use Google to find a number of commercial
3D printing options.
Tell them that if there are different grades of plastic
that they could use, you want the type that is most likely to have a stable shape. You don't want it warping in any way.
Final Comments
You can see that I mounted a bull's eye level in the lower right corner of the compass, but I'm not sure that is worthwhile. We humans seem pretty good at holding a piece of wood
level...better than we are at drilling an inset hole into wood while holding the drill precisely vertical.
When I purchased this wood, it was perfectly flat. But after I had it cut, and brought the pieces home, they developed a gentle, longitudinal trough. Flat is better, but I still
get pretty good accuracy from this sun compass. Of course, any navigational instrument will give more precise results if made in metal or plastic, and created by computer-controlled
machines.
But in this GPS era, celestial navigation is a pretty obscure corner of knowledge, and within celestial navigation, the use of a sun compass is even MORE obscure.
You pretty well need to make your own sun compass if you are going to have one.